
Jul 20
Simple button on NodeMCU - ESP8266
How do you add a simple click button, or pushbutton, to a NodeMCU board you ask? Well, yes. Sometimes the most simple things are not that well documented, or buried in other projects, presumed as being ubiquitous knowledge.
So here is a simple HOW TO.
Hardware
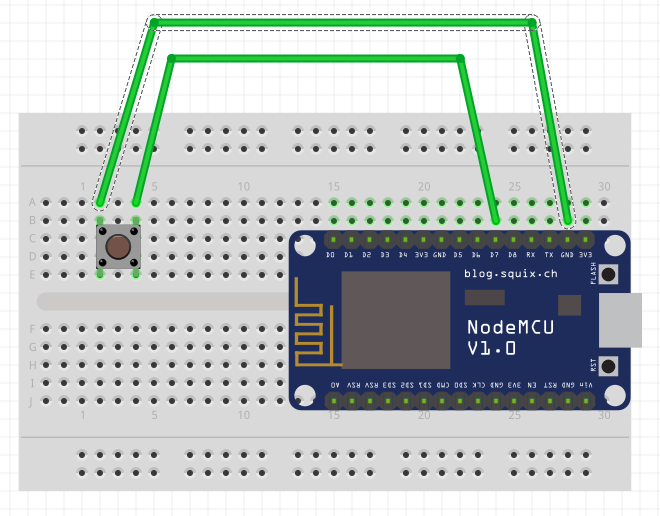
Find a simple button, probably among the parts in your "starter kit", even two wires would do - and attach it to your breadboard. Then add wires between Ground (GND) and Pin D7 (D7) on the NodeMCU board (Pin D7 was chosen arbitrarily, might as well be D5 or whatever):
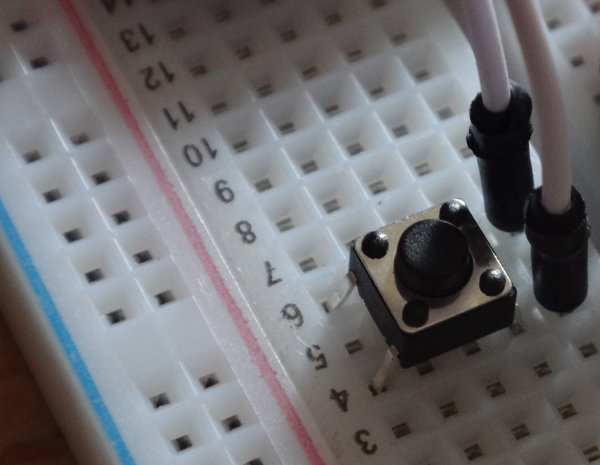
This is how this might look in real life:
Two things are silently assumed here:
1. You know how the conductive metal is arranged below the white breadboard plastic. if you don't know that, take a look at How to use a Breadboard.
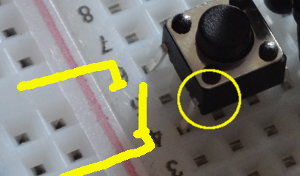
2. You know how these micro-buttons are wired internally. The button has four legs, but for a switch you usually have only two legs. So where is one side of the switch, where the other? Look at the part. The legs are coming out on two sides. You'll use only on of these sides.
3. You won't connect a pin like D7 with VCC ("+", "Voltage at the common collector", 3V3, 5V, ...) BUT with Ground (GND).
Software
Next, the software part. Transfer this as init.lua to your NodeMCU:
-- Config
local button_pin = 7
local count = 0;

-- init GPIO pin propery
-- some hardware might not need the "gpio.PULLUP" part, mine does
gpio.mode(button_pin, gpio.INT, gpio.PULLUP)

-- define a callback function, "pin_cb" for "pin callback"
function pin_cb()
	count = count + 1
	print("Pressed ".. count)
end

-- register a button event
-- that means, what's registered here is executed upon button event "up"
gpio.trig(button_pin, "up", pin_cb)
Most is explained in code, in comments. Transfer this sketch to your NodeMCU and pressing the button will emit a message via serial console.
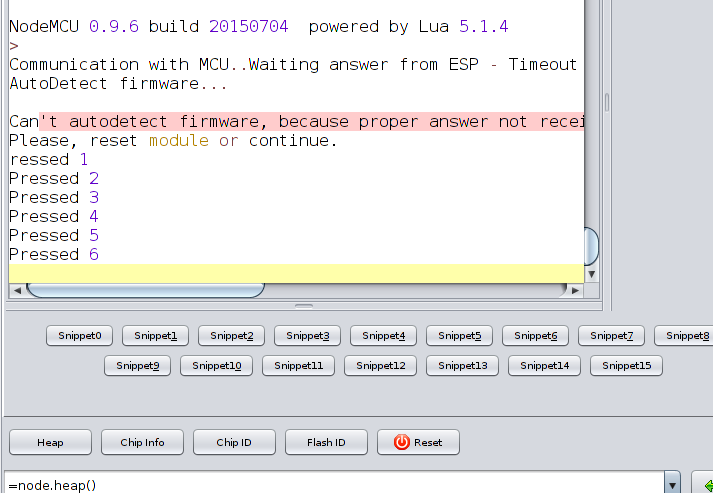
An ESPlorer screenshot might look like this:
Note a few more things:
1. We are using ESPlorer, the NodeMCU / ESP8266 IDE here. It's crossplattform, written in Java github, homepage (don't mind the Kyrillic text, it's being developed by a Russian developer).
2. In comparison to an Arduino sketch, LUA scripting for the NodeMCU urges you to do event based programming, in contrary to using a single loop. This is because a loop would block while each step in the loop is being executed, and that might crash/ induce hickups to the WiFi-Stack working in parallel.
3. We register an event listener to the GPIO pin, which executes upon receiving the "up" event, that means "on button release". We could also execute the callback upon "down", "both", etc. See the docs for details. Also look at related code for details about how things are passed around and work with each other in LUA events-based programming, for example in a stack exchange questions like this one.
From here:
If you'd like to expand on this, try the Toggle LED on/off by pressing a button experiment in a follow-up post.
--
This post is part of a series of Mini Tutorials on the ESP8266:
Previous post: Simple button on NodeMCU
Next post: Toggle LED on/off by pressing a button
I'm tinkering here with a NodeMCU ESP8266 board.
I'm using the ESP8266 Java IDE ESPlorer.
The firmware is version 0.9.6 build 20150704 powered by Lua 5.1.4