
Jul 21
Buzzer and OLED on NodeMCU - ESP8266
Let's emit sound from our ESP8266 microcontroller!
Here we are expanding on our previous circuit from my past post "OLED 128x64 on NodeMCU" and "Simple button on NodeMCU" and add yet another element, a passive buzzer.
The circuitry, laid out on a breadboard, looks like this:
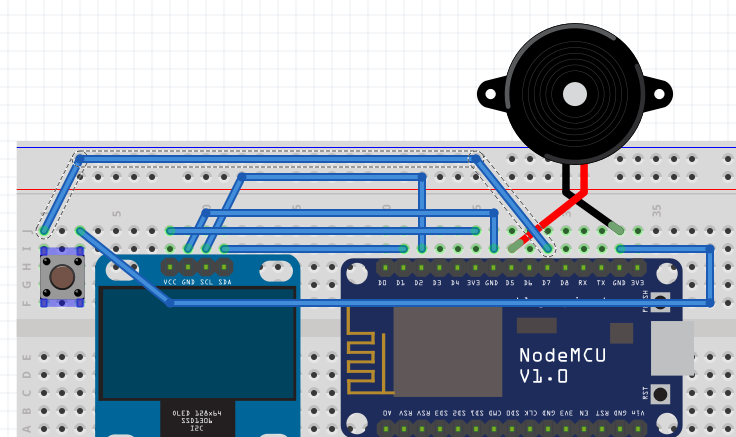
For the experiment, you'll need a passive buzzer, usually part of common Arduino or ESP8266 Starter Kits (buy one).
If you don't know the difference between a passive and an active buzzer, read this short post here. (Spoiler: the one without the "washing label", without sealing on the bottom.)
The software-side of things is this .lua script:
-- OLED animated frame demo
-- a 4 pin I2C OLED 128x64 ssd1306 display module
-- connected to a NodeMCU ESP8266 dev board

-- declare vars
--   board's 3v3 connected to oled's VCC
--   boards' GND connected to oled's GND
sda = 1 -- oled's SDA pin connected to board Pin 1
scl = 2 -- olde's SCL Pin connected to board Pin 2

button_pin = 7
buzzer_pin = 5

frame_x = 0
frame_y = 0
show_text = 1


function init_OLED(sda,scl) --Set up the u8glib lib
     sla = 0x3C
     i2c.setup(0, sda, scl, i2c.SLOW)
     disp = u8g.ssd1306_128x64_i2c(sla)
     disp:setFont(u8g.font_6x10)
     disp:setFontRefHeightExtendedText()
     disp:setDefaultForegroundColor()
     disp:setFontPosTop()
     disp:setRot180()           -- Rotate Display if needed (we do)
end

function write_OLED() -- Write Display
   disp:firstPage()

   repeat
     -- shrink the drawn frame on every iteration towards center
     disp:drawFrame(frame_x, frame_y, 128-(frame_x*2), 64-(frame_y*2))

   if show_text == 1 then
     disp:drawStr(30, 27, "goeszen.com")	-- center text on screen, more or less
   end

   until disp:nextPage() == false

end

function beep(pin, freq, duration)
    print ("beep!")

    pwm.setup(pin, freq, 512)
    pwm.start(pin)
    -- delay in uSeconds
    tmr.delay(duration * 1000)
    pwm.stop(pin)
    --20ms pause
    tmr.wdclr()
    tmr.delay(20000)
end

-- define a callback function named "pin_cb", short for "pin callback"
function pin_cb()
	if show_text == 1
	then
		show_text = 0
	else
		show_text = 1
	end
	print("Button released")
	beep(buzzer_pin, 523, 100)
end


-- Main Program
init_OLED(sda,scl)

-- init GPIO pins properly
gpio.mode(button_pin, gpio.INT, gpio.PULLUP) -- some hardware might not need the "gpio.PULLUP" part, mine does
gpio.mode(buzzer_pin, gpio.OUTPUT)

-- register a button event
-- that means, what's registered here is executed upon button event "up"
gpio.trig(button_pin, "up", pin_cb)

-- register a timed event
tmr.alarm(0, 300, 1, function() -- 700ms between frames
	-- NOTE: It is important to lower frame rates (ms between timer-triggered frame refreshes)
	-- not too far! If you go below the time it takes to push the data over i2c (NodeMCU only
	-- supports speed "SLOW"), you will trigger a crash!
	-- (the maximum is somewhere between 200 and 300ms, btw...)
   write_OLED()
   frame_x = frame_x + 1
   frame_y = frame_y + 1

   if frame_x > 23 then -- the 23 is an arbitrary number, it's where the frame is slightly larger than the text
	frame_x = 0
	frame_y = 0
	beep(buzzer_pin, 880, 100)
   end
end)
The new code is a function called beep(), used to generate a PWM signal on Pin D5.
We call this beep function every time our frame resets to maximum size on the OLED - AND we confirm the user pressing the button with another beep. Frequencies are 880Hz for an A♯ (A-sharp) and 523Hz for a C♯ (C-sharp). In combination with the display (output), the button (input), and the buzzer (auditive feedback, confirmation) we've built a nice little interactive application.
--
I'm tinkering here with a NodeMCU ESP8266 board.
I'm using the ESP8266 Java IDE ESPlorer.
The firmware is version 0.9.6 build 20150704 powered by Lua 5.1.4